Table of Contents

What is CSS (Cascading Style Sheets)?
We've already learned the basic concept of CSS. In the previous lesson, I introduced the "house" analogy, which describes the following:
When building a house...
- HTML is the structure (i.e. wood, bricks, concrete, foundation)
- CSS is the style (i.e. paint, landscaping)
- JavaScript is the function (i.e. electric, plumbing, heating, water)
The first question we have to answer is, what does "cascading" mean?
When working with CSS, it is possible to define more than one style for a single HTML element. Because of this, the CSS needs to know which rule to actually apply to it. When we say "cascading", we are referring to this fact.
Let's say I had the following HTML snippet:
<div class="main-container">
  <p>Some text</p>
</div>
Now, let's add three CSS rules (I'll explain how these work later):
.main-container {
  color: red;
}

.main-container p {
  color: green;
}

p {
  color: blue;
}
The question is–what color will "Some text" be?
The answer is green, but right now, we don't know enough about CSS to make this determination. Let's jump in.
Basic CSS Syntax
Here is the video version of this section
So... What is the purpose of CSS? The purpose of CSS is to "select" an HTML element and apply some type of style to that HTML element. Here are the two things that CSS can do for you:
- Change the layout of HTML elements on the page (rows, columns, sections, sizes)
- Change the style of HTML elements on the page (fonts, colors)
In the Codepen below, I've demonstrated both layout and style. To achieve this result, I have used CSS properties that we will be looking at over the next several lessons.
The diagram below shows the relationship between HTML and CSS in addition to the basic structure of both.
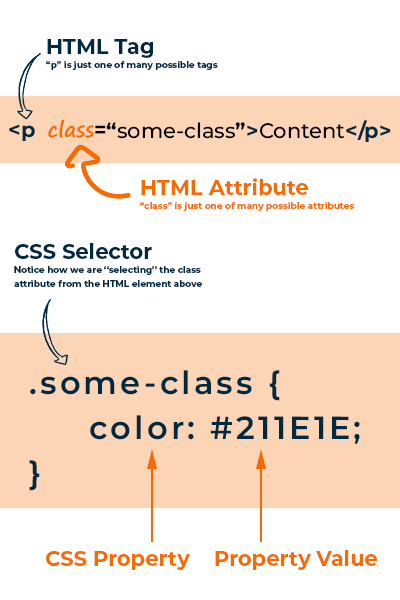
As you can see above, we are using the HTML element's class property to "select" it, and then applying the color style to that element. We have given the color property a value of #211E1E, which is a dark grey color. In effect, we are turning the text dark grey.
In this example, .some-class is the "CSS selector", color is the CSS property, and #211E1E is the CSS property value (a hex code, which we'll cover later).
At this point, it is not clear why I'm using these selectors and properties. For example, why do I have a . before the class name? How did I know to use color to change the text color? To answer these questions, let's explore a few of the basic ways to "select" an HTML element with CSS. Don't worry about all the possible properties yet–we'll get there eventually. For now, I'll try and stick with the color property, which changes the color of the text of the selected element.
The 3 Main CSS Selector Types
There are three primary ways you can "select" an HTML element in order to style it.
- By tag
- By class
- By ID
Since we learned about HTML in the prior lesson, these should sound familiar. Let's take a minute to review anyways.
<p class="main-text" id="first-paragraph">First paragraph of document</p>
Can you spot the tag, class, and id here? Of course! The tag is p, the class is main-text, and the ID is first-paragraph. If you remember from the previous lesson, we were able to use these values to "select" HTML elements using JavaScript. Remember this?
// Select by tag
document.querySelector("p");

// Select by class
document.querySelector(".main-text");

// Select by ID
document.querySelector("#first-paragraph");
The code above selects this HTML element in three different ways using JavaScript. We use the same type of syntax to select this HTML element with CSS.
/* Oh hey, I'm a CSS comment.  I'm slightly different than HTML and JS comments */

/* Select by tag */
p {
  color: red;
}

/* Select by class */
.main-text {
  color: red;
}

/* Select by ID */
#first-paragraph {
  color: red;
}
These are all valid ways to select the HTML element from above using CSS.
For now, I'm going to be using the color property and value as a placeholder to explain CSS selectors and "cascading" concepts. This changes the text color of the HTML element. We will be walking through all the different CSS properties later in the lesson, but we're not quite ready.
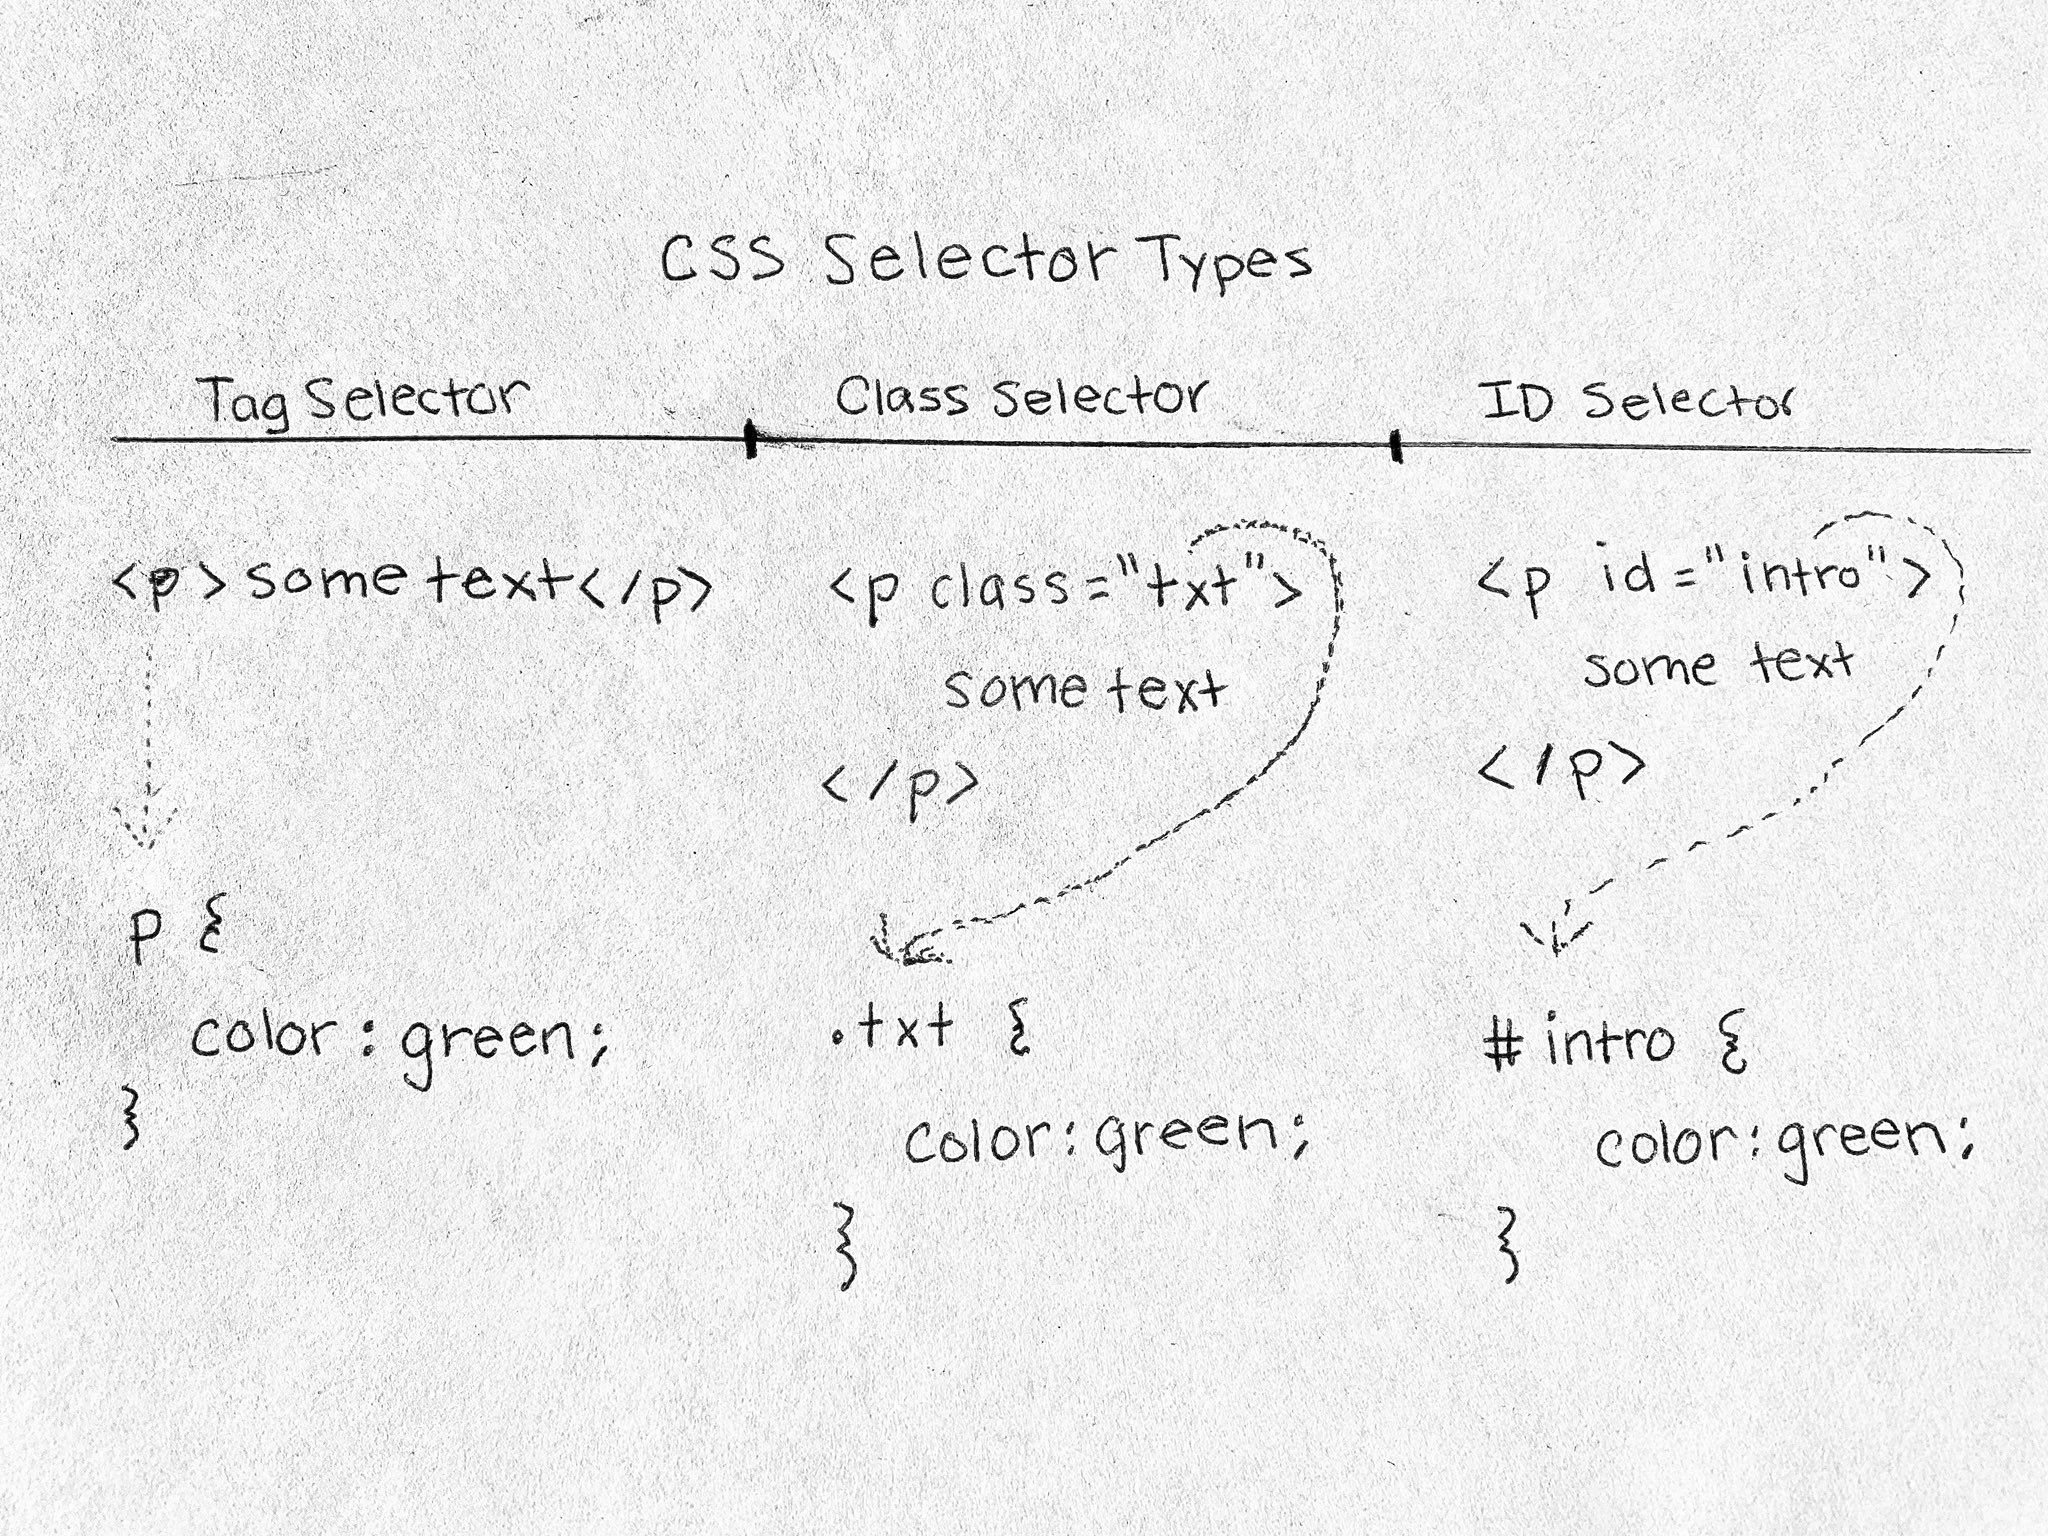
Here is a useful little cheat sheet that I created to help you remember these three most common CSS selector types. The property color: green is not important here. This could be any CSS property.
CSS Combinators
The three methods that I wrote above are the "textbook" ways to select and style an HTML element. But we are on lesson 8 of our series and by now, you have probably caught on to the fact that in web development, there are ALWAYS more ways to do things. The same holds true in this scenario.
With CSS, there are "combinators" that allow us to "combine" our selectors to identify an HTML element. Many times, these can be avoided by placing an ID or class attribute on an element, but you should still be familiar with them. Here's what we're dealing with:
- Descendant selectors
- Child selectors
- Sibling selectors
Hmmm... This sounds familiar, doesn't it...
Do you remember this image from the prior lesson on HTML?
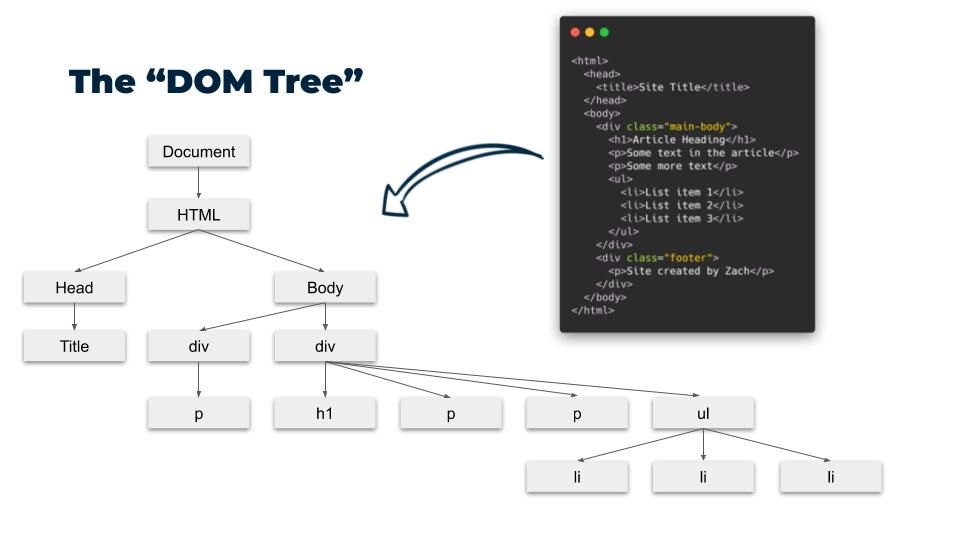
Do you remember how we talked about an HTML document being structured like a big happy family of grandparents, parents, children, and siblings? Well lucky for us, we can leverage that concept once again here.
Let's see how we can combine some CSS selectors to identify various elements in this HTML document. Here it is again in case you can't see it from the photo:
<html>
  <head>
    <title>Site Title</title>
  </head>
  <body>
    <div class="main-body">
      <h1>Article Heading</h1>
      <p>Some text in the article</p>
      <p>Some more text</p>
      <ul>
        <li>List item 1</li>
        <li>List item 2</li>
        <li>List item 3</li>
      </ul>
    </div>
    <div class="footer">
      <p>Site created by Zach</p>
    </div>
  </body>
</html>
Selecting descendants
Let's say that we wanted to put a CSS style on every li element that exists in the <div class="main-body"> element. How would we do this?
Why not something like this?
li {
  color: green;
}
Congrats! All your li elements will have green text. Time to call it a day and have a beer.
Not so fast...
What happens if we put another list inside the <div class="footer"> container?
<html>
  <head>
    <title>Site Title</title>
  </head>
  <body>
    <div class="main-body">
      <h1>Article Heading</h1>
      <p>Some text in the article</p>
      <p>Some more text</p>
      <ul>
        <li>List item 1</li>
        <li>List item 2</li>
        <li>List item 3</li>
      </ul>
    </div>
    <div class="footer">
      <p>Site created by Zach</p>
      <ul>
        <li><a href="#">Footer link 1</a></li>
        <li><a href="#">Footer link 2</a></li>
        <li><a href="#">Footer link 3</a></li>
      </ul>
    </div>
  </body>
</html>
In reality, it is very common to see lists appear in a footer like this, but they are often styled differently than lists in the main body of the HTML. If we used the selector from above, even our footer list items will have green text, which we probably don't want!
Let's come up with a better solution:
/* Select all li elements that exist inside the element with a class of .main-body */
.main-body li {
  color: green;
}
With CSS, we can combine selectors separated by spaces to identify descendants of elements. No matter how many additional HTML elements we add to the .main-body div, they will all inherit this style. To drill this point home further, let's look at some different HTML.
<div id="main">
  <div>
    <div>
      <ul>
        <li>List item 1</li>
        <li>List item 2</li>
        <li>List item 3</li>
      </ul>
    </div>
    <ul>
      <li>List item 1</li>
      <li>List item 2</li>
      <li>List item 3</li>
    </ul>
  </div>
</div>
#main li {
  color: green;
}
By using the "descendant selector" above, we can target all the li tags at multiple levels, so long as they exist below the level of our "pre-selector". In this case, the first selector, #main is the "pre-selector" and the second selector, li is the actual element(s) you are targeting for that style.
Selecting Children
Sometimes, you only need to target the children of a specific HTML element for styles. Let's say you had the following HTML.
<div id="main">
  <p>first paragraph</p>
  <p>second paragraph</p>
  <p>third paragraph</p>
  <div>
    <p>fourth paragraph</p>
  </div>
</div>
If we used the CSS selector #main p, we would be able to style all of the p elements in this HTML. But we can use the following syntax to select only the direct children of #main.
#main > p {
  color: blue;
}
The first, second, and third paragraphs will have blue text while the fourth will have the default text color.
Selecting Siblings
The last type of combinator you can use is a sibling selector, but I think it is important to disclose–I NEVER use these. Others may feel differently about this, but in the five years I've been writing CSS, I have never come across a compelling case for using these selectors. Drop a comment or hit me up on Twitter @zg_dev if you come up with a good reason to use these.
But of course, I can't just make a bold statement like that and expect that you trust me. Let me show you what I mean here.
Let's say you had this HTML document.
<div id="main">
  <ul>
    <li>List item 1</li>
    <li>List item 2</li>
    <li>List item 3</li>
  </ul>
  <p>first paragraph</p>
  <p>second paragraph</p>
  <p>third paragraph</p>
  <ul>
    <li>List item 1</li>
    <li>List item 2</li>
    <li>List item 3</li>
  </ul>
  <p>fourth paragraph</p>
  <p>fifth paragraph</p>
  <p>sixth paragraph</p>
</div>
And for some odd reason, you only want to style the paragraph elements immediately following the lists (first and fourth paragraphs). Here's how you could do that with a sibling selector.
ul + p {
  color: red;
}
This will look through the entire HTML document and look for all p elements that immediately follow a ul element (aka "adjacent sibling"). And if you wanted to target all of the siblings to ul elements, you just change your CSS to this:
ul ~ p {
  color: red;
}
In my opinion, the ~ and + combinators aren't necessary. If you find yourself in this situation, do the following.
- Find the HTML element you want to target
- Add a class or ID to that element
- Style using a class or ID selector
Sure, it's some extra lines of code, but it is easier to follow (and your future self will thank you for writing easy-to-read code).
Other ways to select HTML elements with CSS?
There are other ways to select an HTML element with CSS. For example:
<p class="regular-text">some text here</p>
<div class="regular-text">some text here</div>
p[class="regular-text"] {
  color: blue;
}
If you just used .regular-text to select the elements, you would be styling both the p and div elements. You can specify that you only want the p elements with a class of .regular-text.
The likelihood of a situation like this coming up? Very low. Therefore, I won't be spending time explaining all these nuanced ways of using CSS selectors. You can look them up as you need them.
Remember, this crash course and full-stack developer series is about getting you acquainted with the most important concepts. And 95% of the time, you'll never need anything more than what we've talked about so far. Feel free to dig through some advanced CSS tutorials on your own, but at this stage of your journey, I believe it is a waste of your time to do so.
Selecting multiple HTML elements with CSS
To this point, we've only selected one HTML "group" at a time (one selector can target multiple elements). In certain cases, you might want to apply a few "common" styles to several elements and then add additional styles individually. Let's say you had the following HTML.
<div class="box-1">
  <p>Box 1</p>
</div>
<div class="box-2">
  <p>Box 2</p>
</div>
We haven't talked about CSS properties yet (so don't worry about how these work now), but let's say that we wanted to make both of these boxes the same width and height, but style their borders and text colors separately. Here is the inefficient way to do it:
.box-1 {
  width: 200px;
  height: 200px;
  border: 1px solid green;
  color: green;
}

.box-2 {
  width: 200px;
  height: 200px;
  border: 1px solid blue;
  color: blue;
}
Wouldn't it be nice if we could assign the width and height properties one time rather than writing for each element? Good news, we can! Here's how I would write this CSS.
.box-1,
.box-2 {
  width: 200px;
  height: 200px;
}

.box-1 {
  border: 1px solid green;
  color: green;
}

.box-2 {
  border: 1px solid blue;
  color: blue;
}
By separating each selector using a comma, we can select multiple HTML "groups" at the same time. In the example above, we are applying the width and height properties to both selectors and then individually applying border and color (text color) styles to each.
We haven't talked a lot about software engineering "best practices", but what we did here was "refactor" our previous code to adhere to "DRY" (don't repeat yourself) principles.
Here's the Codepen for this.
Using Multiple Classes on a Single HTML Element
In the example we just looked at, we have two classes and are defining "shared styles" for them. We could achieve this same result another way! Take a look.
The change that I made is subtle. All I did was add another class to the HTML–make sure you add a space between classes in the class HTML attribute.
<div class="box-1 box">
  <p>Box 1</p>
</div>
<div class="box-2 box">
  <p>Box 2</p>
</div>
Instead of having two classes, box-1 and box-2, we now have three. We can use the box class to define our shared styles:
.box {
  width: 200px;
  height: 50px;
}
And then use our individual classes for unique styles.
.box-1 {
  border: 1px solid green;
  color: green;
}

.box-2 {
  border: 1px solid blue;
  color: blue;
}
Two methods, same solution.
Pseudo Classes/Elements
In addition to being able to select multiple CSS groups at once, we can also use something called a "pseudo" class/element. We will NOT be talking in detail about this, but you need to know it exists for when you do come across it in the future.
Here is the one of the most common occurrences of this concept.
<button>Hover me</button>
button:hover {
  color: red;
  cursor: pointer;
}
By adding :hover directly after the button selector, we are saying, "when the mouse hovers over this button, I want to apply the following CSS styles to it".
Like I said, we will not be covering this in detail here. Here is some documentation on pseudo elements and classes that you can read if you are curious.
Here is the example above in action. Hover your mouse over the button to see it work!
Multiple Selectors vs. Nested Selectors
In the previous example, we saw this.
.box-1,
.box-2 {
  width: 200px;
  height: 200px;
}
In the section prior to that, we saw things like this:
.box-1 p {
  color: green;
}
They look awfully similar don't they? As you read and write CSS, be conscious of this difference. In the first case, you're saying "I want to apply these styles to all HTML elements that have a class of box-1 OR box-2". In the second case, you're saying "I want to apply these styles to all p elements that exist inside elements with a class of box-1".
The difference is subtle, but important. Speaking of this difference...
Let's Talk about CSS Specificity
The "cascading" concept in CSS (aka "specificity") is super important for a beginner to understand.
Being able to select HTML elements is part one of the battle. The second part is figuring out which styles apply to the given element. This is not hard when there is only one CSS style per HTML element, but oftentimes, there are several styles competing against each other in a CSS battle. To demonstrate, let's look at some HTML that has many ways to select each element.
<div class="main-container">
  <p class="main-text" id="first-paragraph">First paragraph of document</p>
</div>
Let's say our goal was to change the text color of our p element. We could do that in several different ways.
/* Hey, I'm a CSS comment again. */

/* Everything below does the SAME THING */

p {
  color: red;
}

.main-text {
  color: red;
}

#first-paragraph {
  color: red;
}

div p {
  color: red;
}

div .main-text {
  color: red;
}

div #first-paragraph {
  color: red;
}

.main-container p {
  color: red;
}

.main-container .main-text {
  color: red;
}

.main-container #first-paragraph {
  color: red;
}

div > p {
  color: red;
}

.main-container > p {
  color: red;
}

.main-container > #first-paragraph {
  color: red;
}

.main-container > .main-text {
  color: red;
}
😳
Yep, I know. Not what you wanted to see. And it gets worse...
If you were to write all of these lines of CSS in the same file, they would all be competing with each other.
"But why would you ever put multiple styles in the same CSS file?"
If you are the only developer writing the styles for your HTML, then you probably wouldn't. But in many cases, a website or web app will have multiple stylesheets, and some of those will be externally generated. In other words, you may want to take a pre-existing website theme and apply your own custom styles to it. In this case, you will be writing competing styles to the ones that were already defined.
And in this case, you need to know which style declarations take precedence over one another.
There are two dimensions we must think about here.
- Location of the CSS selector in the file
- Specificity of the CSS selector
Location of the CSS Selector in the File
Let's start easy. Say we had the following HTML.
<p>Some text</p>
If we had the following CSS file, what color will the text be?
p {
  color: red;
}

p {
  color: green;
}
If you have been following along with this series, you might be thinking, "That's not valid CSS! You've already declared p, you can't do it again!".
Good logic, but it is indeed valid CSS. Unlike JavaScript, you can declare the same CSS rule twice in the same file. Knowing this fact, which style takes precedence here?
The text will be green because that is the last rule in the file. CSS will always give the final rule precedence assuming the selectors have the same level of "specificity".
Specificity of the CSS Selector
Let's modify the example from above.
<p class="my-text">Some text</p>
.my-text {
  color: red;
}

p {
  color: green;
}
What color will the text be? The answer is red. In this case, even though our color: green style came last in the file, it doesn't matter because selecting an HTML element by its class is "more specific" than selecting by its tag.
Here is the continuum of CSS selector "importance":
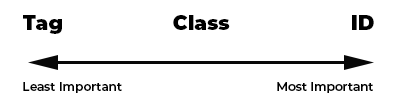
In other words, if given the choice of the following three selectors, the text color will be set to green no matter which order you place the rules in because it is the "most specific".
#first-paragraph {
  color: green;
}

p {
  color: red;
}

.main-text {
  color: red;
}
Easy enough, but this "specificity" business gets a little confusing when we start talking about something like this:
<div>
  <p class="my-text">paragraph text</p>
</div>
div .my-text {
  color: red;
}

.my-text {
  color: green;
}
What color will the text be? The answer is red.
When we look at a selector like div .my-text, it is basically saying, "find me all elements with a class name my-text that are descendants to div elements". Then we have to ask ourselves... Does the first paragraph have a class of my-text AND a div ancestor (could be parent, grandparent, great-grandparent, etc.)? The answer is yes, so the paragraph text will be red.
In summary, even though the second CSS rule above is at the end of the file, that doesn't mean it will apply to all elements.
After reading the last couple of paragraphs, you might be thinking that this is awfully complicated. To help us out, let's look at two ways that you can always use to determine which CSS rule applies to each HTML element. Here they are:
- Test it out (my favorite method)
- Calculate it
The easiest way to figure it out is to put together an example in Codepen and see which one takes precedence (as we did above).
The second way is to actually calculate the "specificity" of a CSS rule. Here's how you do that.
- Count the number of ID selectors in the rule
- Count the number of class selectors in the rule
- Count the number of tag selectors in the rule
Combine the count from steps 1-3 in order, and you've got your "specificity" value.
Let's do that for our two rules from above. See the comments for the calculation.
/*
  Number of ID selectors - 0
  Number of class selectors - 1
  Number of tag selectors - 1

  Total "Specificity" - 011
*/
div .my-text {
  color: red;
}

/*
  Number of ID selectors - 0
  Number of class selectors - 1
  Number of tag selectors - 0

  Total "Specificity" - 010
*/
.my-text {
  color: green;
}
As you can see, the first selector is more specific than the second, and therefore will always take precedence (unless it simply does not apply to the HTML element like we saw in the second paragraph from our example above).
Let's look at one last example to really nail this concept. Here's the HTML and CSS with the specificity calculation.
<div class="my-container" id="container-id">
  <p class="my-text" id="text-id">Some text</p>
</div>
All of the rules below select the same p element above.
/*
  Number of ID selectors - 0
  Number of class selectors - 2
  Number of tag selectors - 0

  Total "Specificity" - 020
*/
.my-container .my-text {
  color: red;
}

/*
  Number of ID selectors - 2
  Number of class selectors - 0
  Number of tag selectors - 0

  Total "Specificity" - 200
*/
#container-id #text-id {
  color: orange;
}

/*
  Number of ID selectors - 1
  Number of class selectors - 0
  Number of tag selectors - 1

  Total "Specificity" - 101
*/
div #text-id {
  color: green;
}

/*
  Number of ID selectors - 1
  Number of class selectors - 0
  Number of tag selectors - 0

  Total "Specificity" - 100
*/
#text-id {
  color: blue;
}

/*
  Number of ID selectors - 0
  Number of class selectors - 0
  Number of tag selectors - 1

  Total "Specificity" - 001
*/
p {
  color: purple;
}
The text color will be orange because the total specificity of that selector is the greatest. Once again, you can always just test it out like I did below!
Inline HTML Styles
The last thing we have to talk about are inline styles. They look like this.
<p style="color: red; padding: 1px;">Some text</p>
If you apply an inline style, it will take precedence over all other styles, but it is usually not recommended because too many of these will really clutter up your HTML! Some CSS frameworks implement inline styles like this, but that is a debate and topic for another day. For now, just keep these to a minimum.
Here is a Codepen example that shows how an inline style can override a style applied with an ID selector.
The !important keyword
What if I told you that by writing a single word, you can override all the CSS "specificity rules" (including inline styles)?
If you write !important at the end of a CSS property, it will take precedence over every other rule. Here's an example.
<p id="my-text">Some text</p>
p {
  color: red !important;
}

#my-text {
  color: blue;
}
While the second selector has more specificity, the text will be red because we have added !important to the end of the property value. This can be done on a property-by-property basis. For example:
p {
  color: red !important;
  font-size: 18px;
}

#my-text {
  color: blue;
  font-size: 16px;
}
In this case, the color will be red but the font size will be 16px.
Now let's have a little chat about this !important keyword. While it does provide you with an easy way to get a CSS style working without having to think much, it is usually a bad practice. There is no definitive guideline as to when this is acceptable to use, but here is a good rule of thumb.
Use !important if doing so is the ONLY viable method for styling an element
This could occur if you are trying to override styles applied from an external stylesheet (CSS frameworks, UI libraries, etc.).
What is a CSS Property?
As I introduced at the beginning of this lesson, CSS allows us to achieve two primary objectives:
- Styling HTML elements
- Positioning HTML elements (layout)
What if I wanted to create an HTML element that has a blue background, is a perfect square, has a black border, and has some large white text centered in the middle? I can do this with basic CSS properties.
The HTML for this is simple:
<div>
  <h2>Some Text</h2>
</div>
The CSS is the tricky part.
div {
  width: 200px;
  height: 200px;
  border: 5px solid black;
  background-color: navy;
  color: white;
  text-align: center;
  line-height: 200px;
}

h2 {
  margin: 0;
}
As you can see, I've used a variety of properties to achieve this result. From width, height, and border to background-color, color, and text-align, combining these CSS properties together helps us achieve the intended result.
Here is the live version of this example.
How do I know what CSS properties to use?
Great question.
I don't have a great answer.
The truth is, knowing what properties to use is largely a matter of time combined with lots of experience. Studying all the properties at once won't help you. Making flash-cards might help a little, but I wouldn't recommend it.
As we dive into the Box Model and some common CSS properties, try to focus on concepts; not memorization. After all, you've always got the CSS documentation if you forget what something does.